
Copyright 2002-2021 V
W - All Rights Reserved.
QuickBooks Online Requirements and Set Up
Requirements
Any QuickBooks® Online Company that will be the recipient of data sent from
VinNOW will be an as-new QBO Company, free of any data. It cannot have
any existing data that may cause conflict with the data coming from
VinNOW. This includes data that has been imported from a QB Desktop
Company which held VinNOW data. The structures underlying the Desktop
and the online versions of QB are considerably different. The difference is
enough so that records imported from the QB Desktop to QB Online will likely
require a substantial effort to "match" their source.
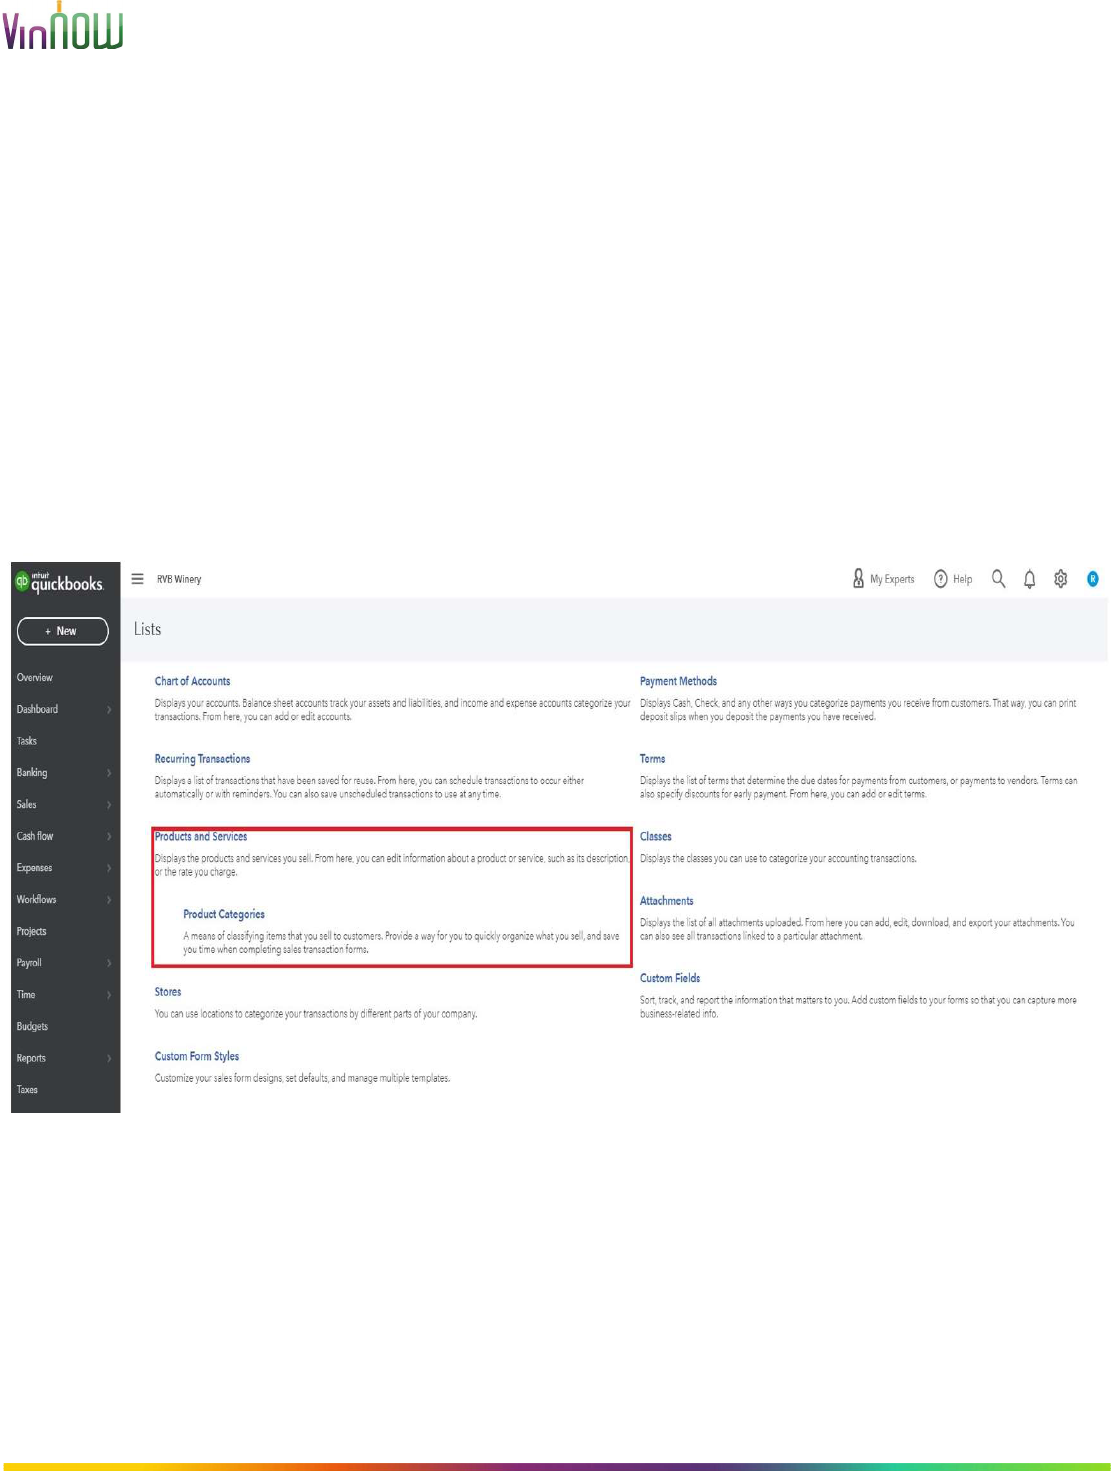
Within the QBO Products and Services realm, the "Product Categories" feature
must be available and active. This will be the default arrangement in QBO at
some point. But at the present time, it may have to be set manually in
QBO. Without it, data uploads from VinNOW will fail. The "Product
Categories" in QBO are analogous to the QB Desktop's "Sub-Items" usage.
For each state for which you collect and pay taxes based on product sales, a
Tax Agency must be created. This process is documented below.
Setup
Before you use the VinNOW to QuickBooks® Online Integration you must
complete the following:
1. QuickBooks® Online Company Settings
2. Authorize VinNOW to Access Your QuickBooks® Online Company
3. VinNOW Option Settings for QuickBooks® Online Uploads
4. VinNOW Product Settings for QuickBooks® Online
QuickBooks® Online Company Settings
From within the QuickBooks® Online program, there are several Company
Settings that should be configured to insure your VinNOW data is uploaded
successfully. These should be set prior to your first data upload.

Copyright 2002-2021 V
W - All Rights Reserved.
REQUIRED: Automated Sales Tax
From Intuit’s documentation for QuickBooks Online: “…US QuickBooks Online
companies created after November 10, 2017 manage sales tax calculations
via an automated sales tax (AST) engine. Sales tax is determined based on
the source and destination address. The source address is the company’s
legal address as available in the company settings. The destination address is
the shipping address provided on the sales transaction. If a shipping address
is not provided, the company address is considered as the destination
address. The ability to customize the source address based on location of a
given transaction is not supported...”
How the QuickBooks Automated Sales Tax affects invoices imported
from VinNOW:
The VinNOW export to your QB Online Company is able to override the QB
automated sales tax value. For each invoice, VinNOW sends the tax value
which was charged on that invoice at the time the invoice was created in
VinNOW. As long as the Tax Agency applicable to the destination address has
been created by the User in the QB Online Company, the tax amount will now
be the same in VinNOW and QuickBooks. If the destination Tax Agency is not
already created, then the tax value for the invoice will be calculated by
QuickBooks’ automated sales tax engine. That value may be different from
what is on the VinNOW invoice. In other words, we cannot override the
QuickBooks automated sales tax value if the User has not created a tax
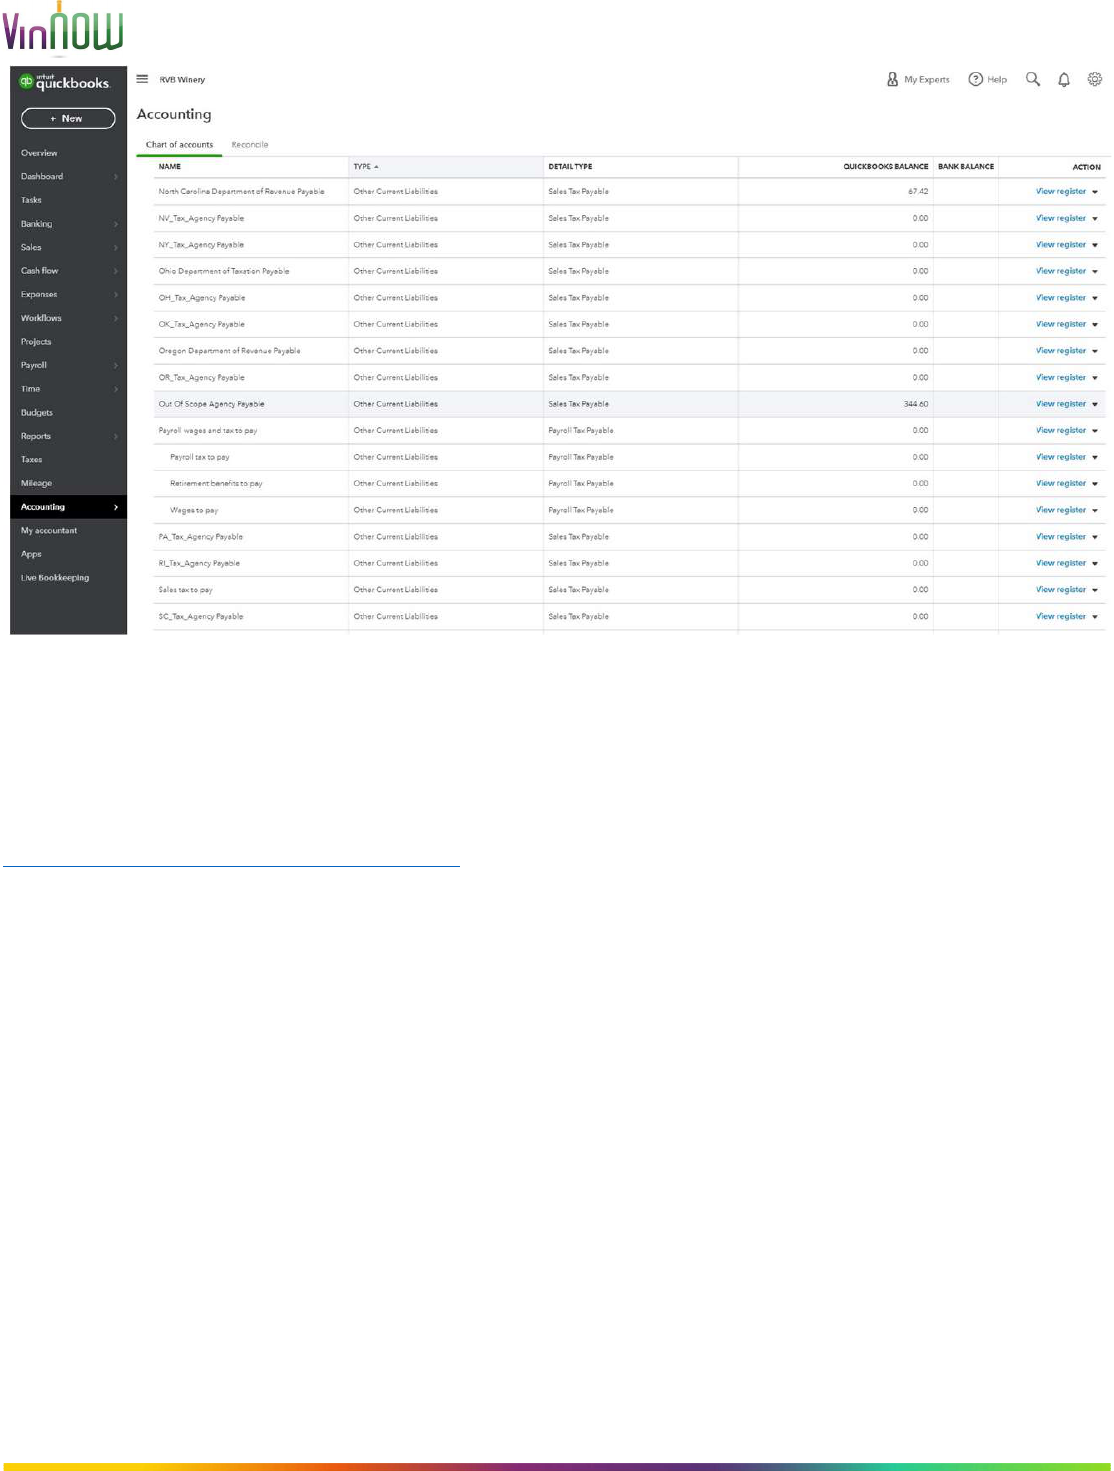
agency for the applicable state. Additionally, if the destination tax agency has
not been created, the invoice tax amount will be lumped into a general-
purpose Chart of Accounts category of type ‘Sales Tax Payable’. That
particular Chart of Account name will likely default to “Out of Scope Agency
Payable”. As illustrated below:
Copyright 2002-2021 V
W - All Rights Reserved.
Setting up QB Online Company for Tax:
The YouTube video at the following link provides instruction for setting up Tax
Agencies for your QuickBooks Online Company. You should create a Tax
Agency for each state your products are sold.
https://youtu.be/eNyXZ8GbR5M
For VinNOW purposes, it is necessary only to create a Tax Agency at the
State level for any state you sell product and collect taxes. This can be
accomplished quite easily and takes minimal time to complete. Even if adding
Tax Agencies for dozens of states.
NOTE: The following steps are copied directly from QuickBooks Online Help.
Step 1: Check your business address
Make sure your business address is correct, so QuickBooks can set up the
right tax agency for you.
1. Go to Taxes.
2. Select Get started.

Copyright 2002-2021 V
W - All Rights Reserved.
3. You'll see your business name here if you updated your business
info in Settings
⚙
. If not, select Edit
✎
to add your business address.
4. Review your address and then select Next.
Note: In your next invoice or sales receipt, QuickBooks will automatically use
your business address as the sale location. If you need to, you can
always change the location on the transaction.
Step 2: Add multiple tax rates and agencies
QuickBooks automatically locates tax names and rates according to your
business address. You just need to match the tax agency for each rate.
1. Select the TAX RATE NAME checkbox that applies to your business
location.
2. Select the OFFICIAL AGENCY NAME ▼ dropdown menu, then select
the appropriate agency for the tax name.
3. Select Next.
4. Review your rates. If the rates are correct, select Save.
5. Once you have set up your sales tax, select Continue.
Step 3: Tell QuickBooks how often you file
You’re almost finished. Just make sure to set up your filing frequency so
QuickBooks can remind you when it’s time to file.
Note: Not sure how often you should file? Check your sales tax business
registration or go to your tax agency’s website to know your filing frequency.
1. Select the Filing frequency ▼ dropdown, then choose how often you
file.
2. When you’re done, select Save.
That’s it. On your next invoice or sales receipt, QuickBooks will do all sales
tax calculations for you. Check out how QuickBooks automates sales tax
calculations.
Add a new tax rate and agency
If you charge sales tax outside your state, you can add other tax agencies
you pay. Here’s how to add or edit sales tax rates and agencies.

Copyright 2002-2021 V
W - All Rights Reserved.
To add a tax rate and agency:
1. From the left menu, select Taxes.
2. Under the Related Tasks list on the right, select Add/edit tax rates
and agencies.
3. Select New and choose either a single or a combined tax rate.
4. Enter a name for the tax, the agency you pay, and the percentage for
the rate. Use a single rate if you pay just one rate to a single agency.
5. Select Save.
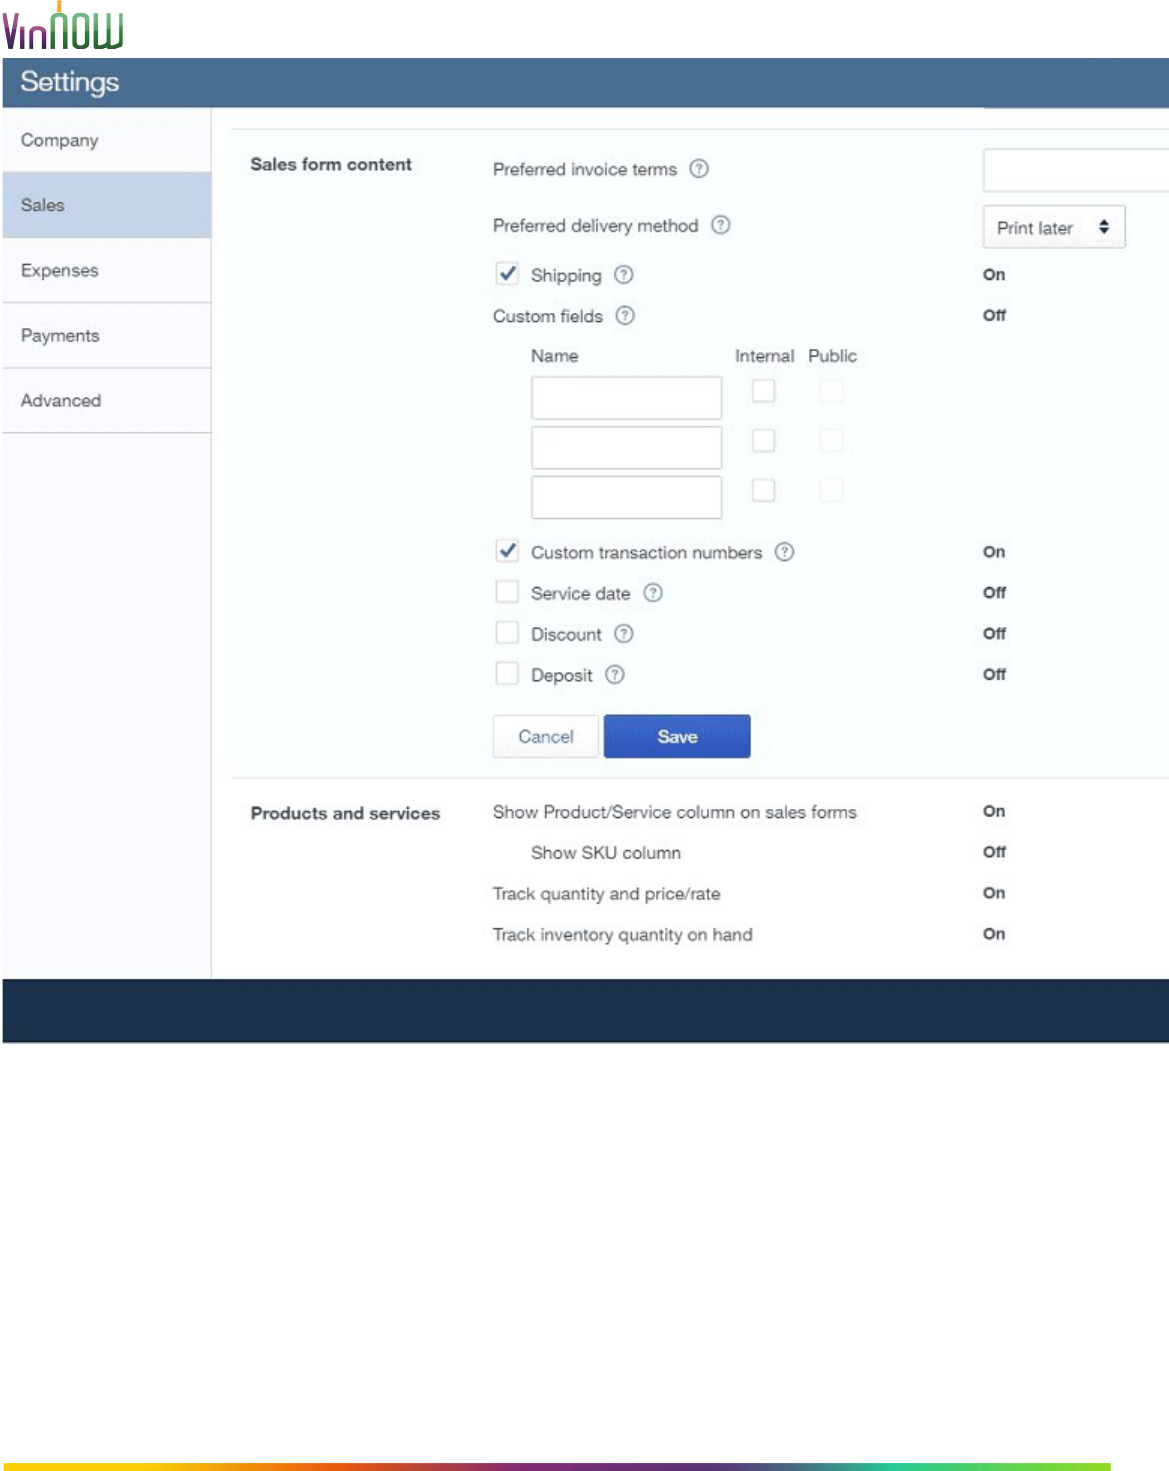
From within the QuickBooks® Online Company Settings screen:
1. On the "Settings Sales" tab: Within the "Sales Form Content" section,
the "Shipping" option should be set to true/checked.
2. On the "Settings Sales" tab: Within the "Sales Form Content" section,
the "Custom Transaction Numbers" option should be set to true/checked.
3. On the "Settings Sales" tab: Within the "Sales Form Content" section,
the "Service Date" option should be set to true/checked.
4. On the "Settings Sales" tab: Within the "Sales Form Content" section,
the "Discount" and "Deposit" options should be left at their default value of
false/unchecked.
5. On the "Settings Sales" tab: Within the "Products and Services"
section, the "Show Product/Service Column on Sales Form” option should be
set to true/checked.
6. On the "Settings Sales" tab: Within the "Products and Services"
section, the "Track Quantity and Price/Rate” option should be set to
true/checked. Failure to check this setting will cause the VinNOW upload of
Products and Invoices to fail
7. On the "Settings Sales" tab: Within the "Products and Services"
section, the "Track Inventory Quantity on Hand” option should be set to
true/checked. Failure to check this setting will cause the VinNOW upload of
Products and Invoices to fail
8. On the "Settings Advanced" tab: Within the "Categories" section, set
"Track Classes" to true/checked. Under "Assign Classes", select the "One to
Entire Transaction" option. The VinNOW Invoice Order Type field is passed to
QuickBooks as a Class.
Copyright 2002-2021 V
W - All Rights Reserved.
9. On the "Settings Advanced" tab: Within the "Categories" section, set
"Track Locations" to true/checked. Choose whichever value you want for the
"Location Label". NOTE: This option is primarily for VinNOW locations that
operate multiple stores. Using this will allow you to filter QBO selections by
individual stores on reports and queries.
10. On the "Settings Advanced" tab: Within the "Chart of Accounts"
section, a value should be selected for the "Shipping Account". QBO defaults
this to "Shipping Income".
11. Under the "Lists - Products and Services" page, make certain that
the "Product Categories" feature is active for your QBO Company. If it is not,
then it needs to be activated prior to any data upload from VinNOW.
Copyright 2002-2021 V
W - All Rights Reserved.
Authorizing VinNOW to Access Your QuickBooks® Online Company
Your VinNOW data is uploaded into your QuickBooks® Online Company by
our VinNOW to QuickBooks® Online integration program. Before we can
upload data to your QBO Company, you must grant authorization to VinNOW
to access your QBO Company data.
This Authorization can only be granted by a User having Administrator rights
within the QuickBooks® Online Company.
Copyright 2002-2021 V
W - All Rights Reserved.
Authorization is a one-time process. Once granted, it is good for 180
days. Within 30 days of Authorization expiration, the VinNOW integration
program will renew the Authorization for another 180 days. This renewal
process should be transparent to the User. In the event the renewal fails,
you will be notified and prompted to manually renew the Authorization.
Granting Authorization
The Authorization process is initiated from the QuickBooks® Online Company
Setup form.
On the main Customer Search screen select the Setup / System Option
Settings menu and select the QuickBooks® tab. Click the "QuickBooks®
Online Setup..." button located toward the bottom right of the screen. This
will bring up the QuickBooks® Online Company Setup form
Begin by clicking the green "Connect to QuickBooks".
Copyright 2002-2021 V
W - All Rights Reserved.
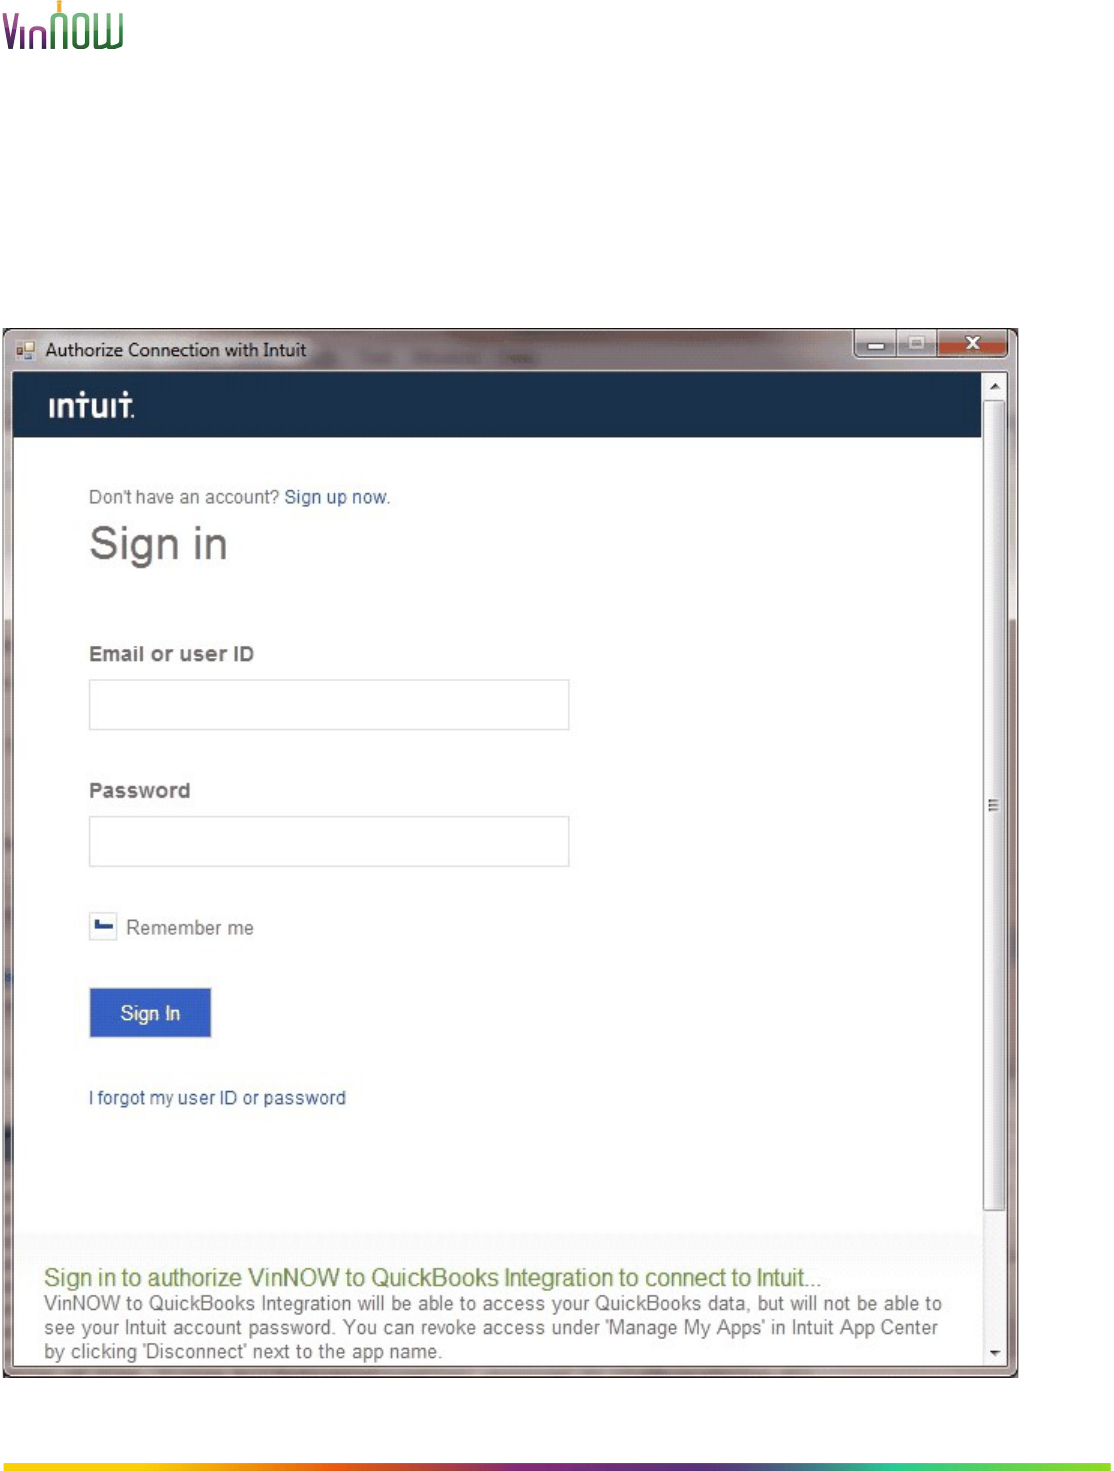
Clicking the green "Connect to QuickBooks" button will brings up the Intuit
Sign In form. Enter the User ID and the Password belonging to the
QuickBooks Online Company you are granting authorization for. Click "Sign
In".
Note: VinNOW Support does not have access at any time to your
passwords and cannot assist you if there is an issue with it.
Copyright 2002-2021 V
W - All Rights Reserved.
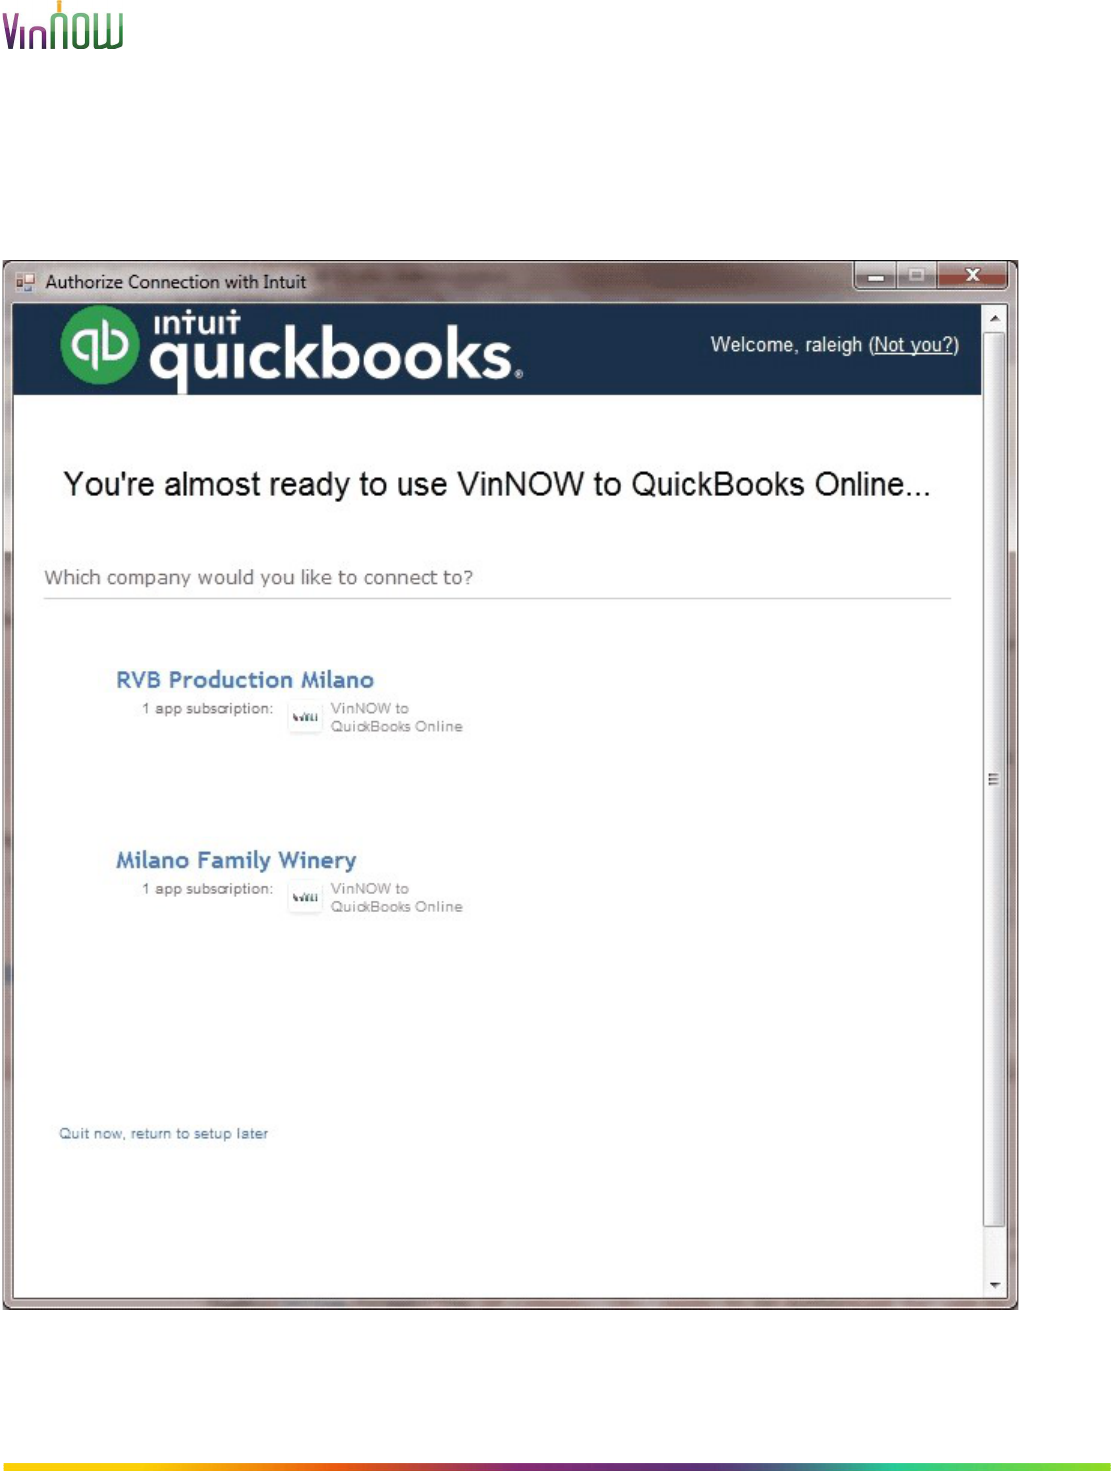
If the login is successful, you will be presented with a list of your QuickBooks
Online Companies. Select the QuickBooks Online Company by clicking on the
Company name.
Copyright 2002-2021 V
W - All Rights Reserved.
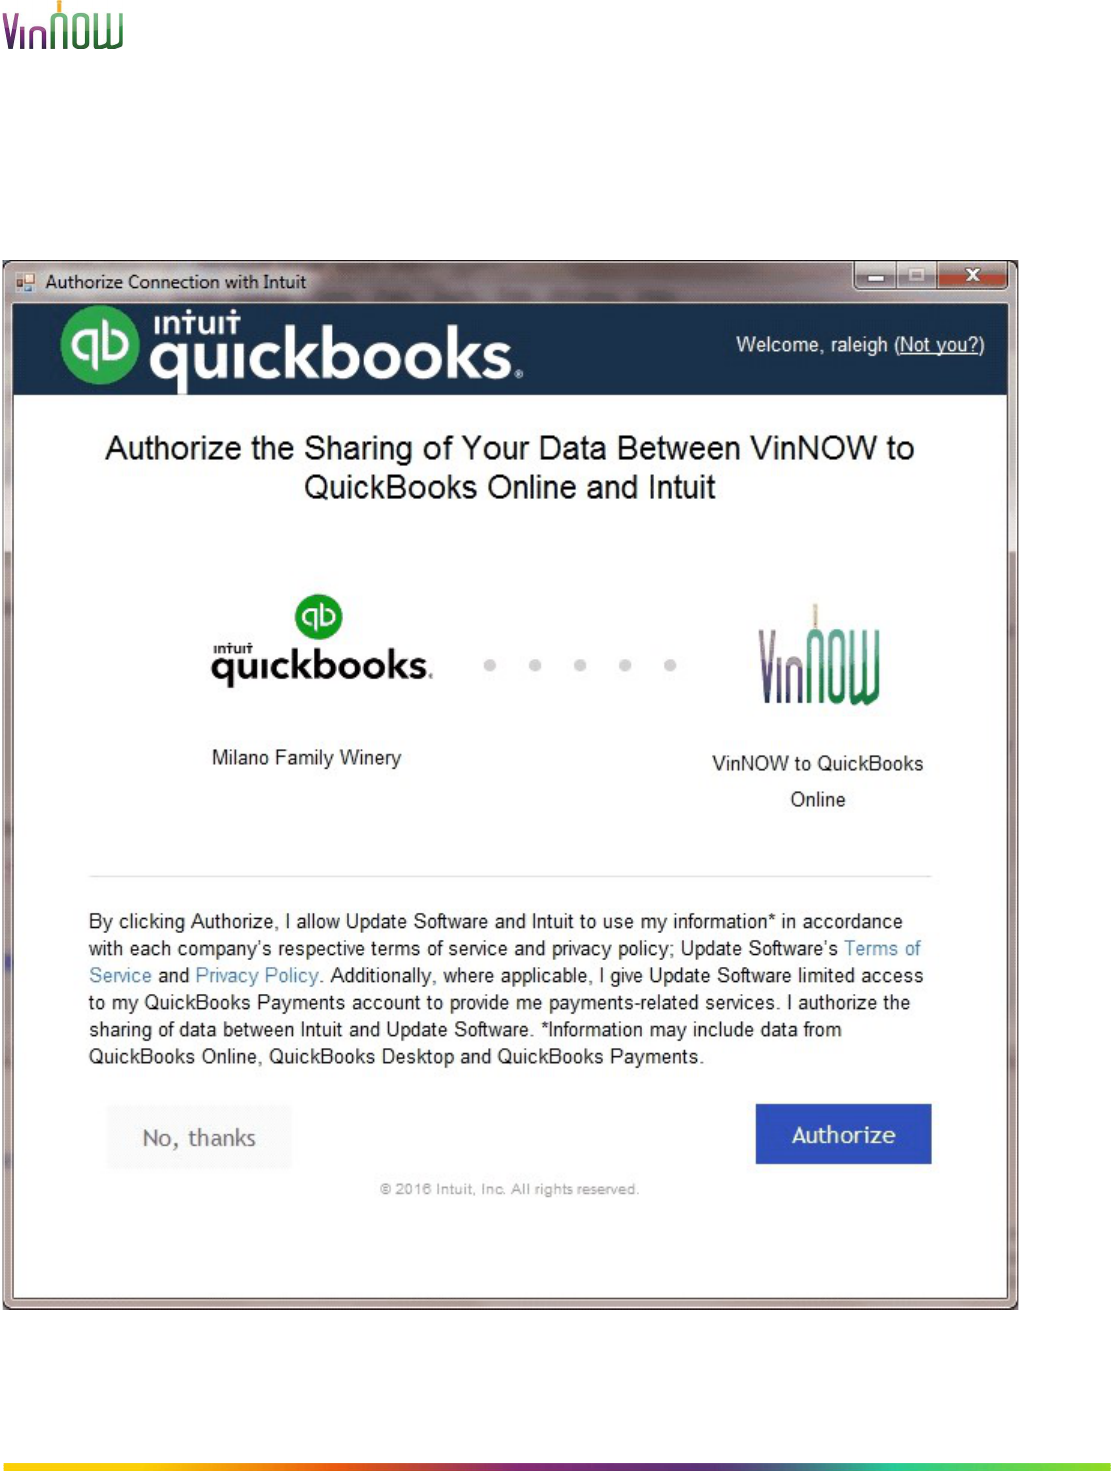
The final form in the authorization process should now be displayed. To
grant authorization to VinNOW, click the "Authorize" button on the displayed
form.
Copyright 2002-2021 V
W - All Rights Reserved.
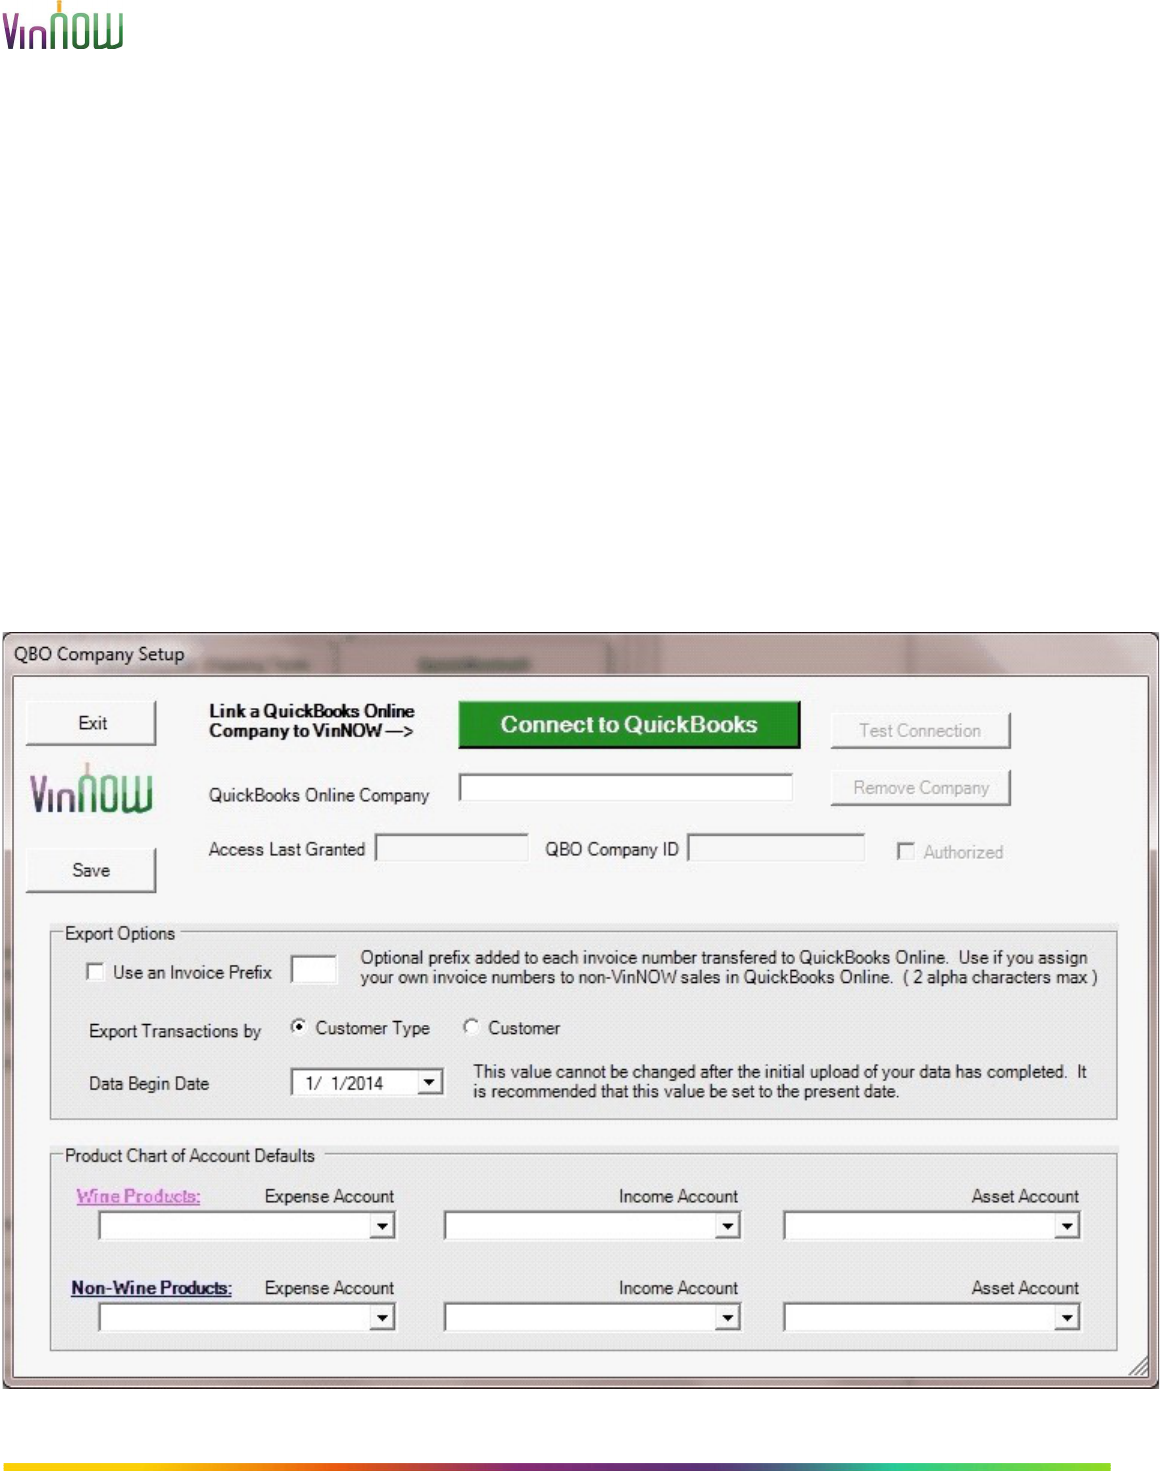
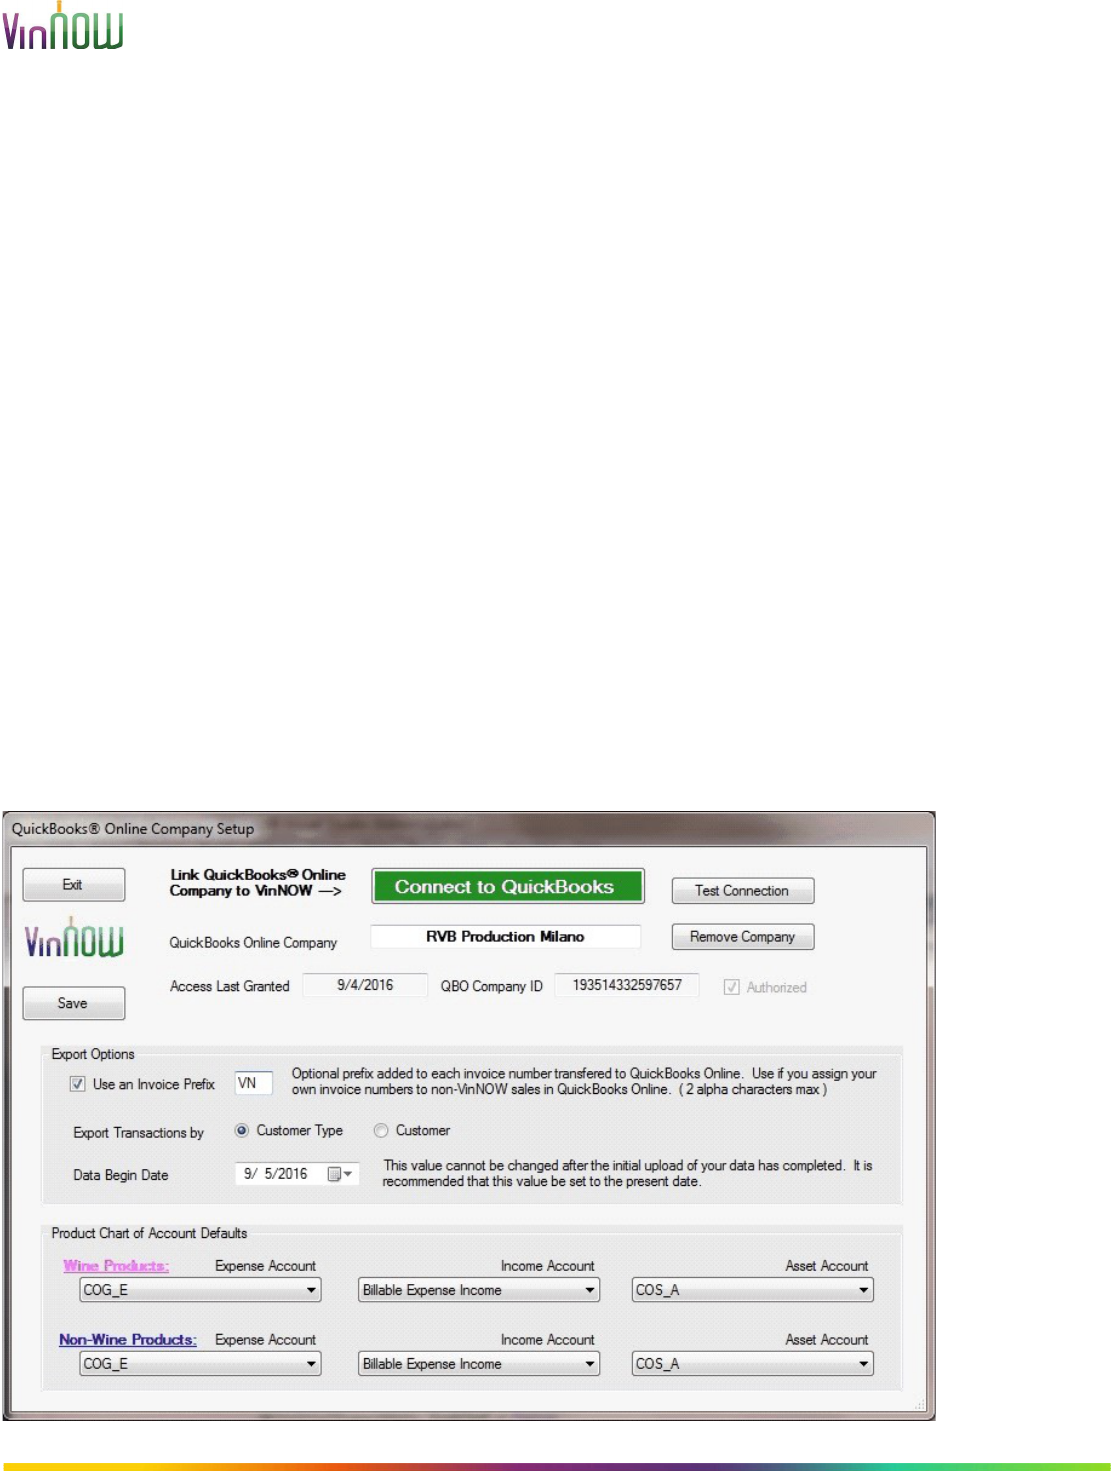
Once the Authorization process is completed, you are returned to the
QuickBooks® Online Company Setup form in VinNOW.
Values should now be displayed for each of the following read-only items on
the form:
QuickBooks Online Company; Access Last Granted; QBO Company ID.
The "Authorized" box should be checked.
If desired, you can check the connection between VinNOW and QuickBooks
Online by clicking the "Test Connection" button.
After successfully completing the Authorization process, the upload options
present on the form should all be set before saving the form by clicking the
"Save" button.
VinNOW Option Settings for QuickBooks® Online Uploads
On the main Customer Search screen select the Setup / System Option
Settings menu and select the QuickBooks® tab. Click the "QuickBooks®
Online Setup..." button located toward the bottom right of the screen. This
will bring up the QuickBooks® Online Company Setup form.

Copyright 2002-2021 V
W - All Rights Reserved.
Export Options:
Use an Invoice Prefix
The Invoice Prefix is an optional setting which will add a prefix to each invoice
uploaded to QuickBooks. If you manually add non-VinNOW invoices into
QuickBooks it is recommended that you set a prefix to insure that your
VinNOW invoices are unique. The value of the prefix is a maximum of 2
alphabetic characters. To activate this option, click on the 'Use an Invoice
Prefix' box and then enter your desired prefix in the adjacent textbox.
Warning: If you manually add non-VinNOW invoices to QuickBooks you need
to make sure the QuickBooks invoice numbers are changed so they will not
conflict with VinNOW invoice numbers that will be uploaded to QuickBooks.
QuickBooks by default will always set the invoice number to the last number
used plus 1, when adding an invoice manually. Therefore if you manually add
an invoice to QuickBooks and the VinNOW prefix is “VN”, you should change
the prefix on the invoice you are adding to insure it will not conflict with a
subsequent data upload from VinNOW.
Export Transactions by
Transaction data can be uploaded to QuickBooks® Online by individual
Customer, or by the associated Customer's Customer Type. The default
setting is to upload using the Customer Type.
The default is to use the Customer Type. This will create a single customer
record in QuickBooks® Online for each VinNOW Customer Type. This means
that all of your invoices uploaded to QuickBooks® Online will be grouped
together by their respective customer type. You will still be able to view the
actual customer name and number because each invoice’s Bill To information
is passed to QuickBooks® Online.
If electing to export by Customer, individual customer records will be created
in QuickBooks® Online. The Customer's full demographics data will exported.
The QuickBooks Customer Name field for customer records created by the
upload program will be in the format: “last name, first name (VinNOW
Customer #)”. For example, VinNOW Customer John Smith #1101 in
QuickBooks will be: Smith, John Smith (1101).
Note: We recommend that unless you absolutely need all of your
VinNOW customer records duplicated in QuickBooks, that you go with
the default of using the Customer Type.

Copyright 2002-2021 V
W - All Rights Reserved.
Data Begin Date
This setting allows you to control how much historical data will be uploaded
into your QuickBooks company file. The Data Begin Date sets the point from
which your VinNOW transaction data (Invoices, Payments) will be selected for
export into QuickBooks® Online during the Initial Upload.
The Initial Upload is used to upload any historic data from VinNOW to
QuickBooks® Online. It also uploads all supporting lists needed for creation
of Invoices and Reports within QuickBooks® Online. Supporting lists include
Products, Payment Terms, Classes, Customers/Customer Types and Vendors.
The Initial Upload is run once. It must complete successfully before any
subsequent exports to QuickBooks® Online can be executed.
Once the Initial Upload has been completed, the 'Data Begin Date' cannot be
changed. Subsequent QBO uploads will be based on the ending date of any
prior upload. That prior end date sets the start point for the next upload. The
upload will select VinNOW data from that date through to the current date.
Note: We highly recommend that you set Transfer beginning date to the
current date or a future date so as to use the VinNOW to QuickBooks upload
feature on a go-forward basis rather than attempt to load historical data into
QuickBooks.
VinNOW Product Chart of Account Settings for QuickBooks® Online
Product Chart of Account Defaults
Each Product uploaded to QuickBooks® Online is required to provide a value
for each of its Asset, Expense and Income general ledger accounts.
The QuickBooks® Online Company Setup form provides controls for setting
the default general ledger account values for your products. There is one set
of controls for Wine products, and another set of controls for NonWine
products. A default value for each account type is required.
The selection list for each general ledger account type is created using
existing accounts from your QBO Company. If there are specific general
ledger accounts that you want your Products linked to, they should be created
in QBO prior to completing the QBO Company Setup form in VinNOW. The
only values included in an account selection list are the account names for the
applicable general ledger account type (asset, expense, income) being set.

Copyright 2002-2021 V
W - All Rights Reserved.
If no general ledger accounts are available from the QBO Company for any
account type, then our program will create one. That account name will be
based on the account type. Something along the lines of “VN Proxy Asset" for
asset account type. Or "VN Proxy Expense" for expense account type.
For any VinNOW Product uploaded to QBO, its general ledger account values
will be set to the default values set on this form. Please note that a Product's
account values can be modified from within the QuickBooks® Online
program.
For VinNOW Users who have set their Product's general ledger account values
for the Desktop version of QuickBooks®. The upload program will attempt to
use those account values for each Product as it is uploaded to QuickBooks®
Online. Those general ledger accounts will be created in QBO if they do not
already exist. If necessary, to avoid duplicate names, our program may
modify the account name by appending it with an account qualifier of _A, _E
or _R. Denoting respectively: Asset, Expense, Income/Revenue account.
Uploading Data From VinNOW To QuickBooks® Online
Initial Upload:
The first upload to QuickBooks® Online is the Initial Upload. The initial
upload will lay the groundwork in QBO so that subsequent uploads of Invoices
and Payments can occur.
The form is accessed by clicking the "QuickBooks® Online Data Transfer..."
item under the VinNOW Utilities menu.
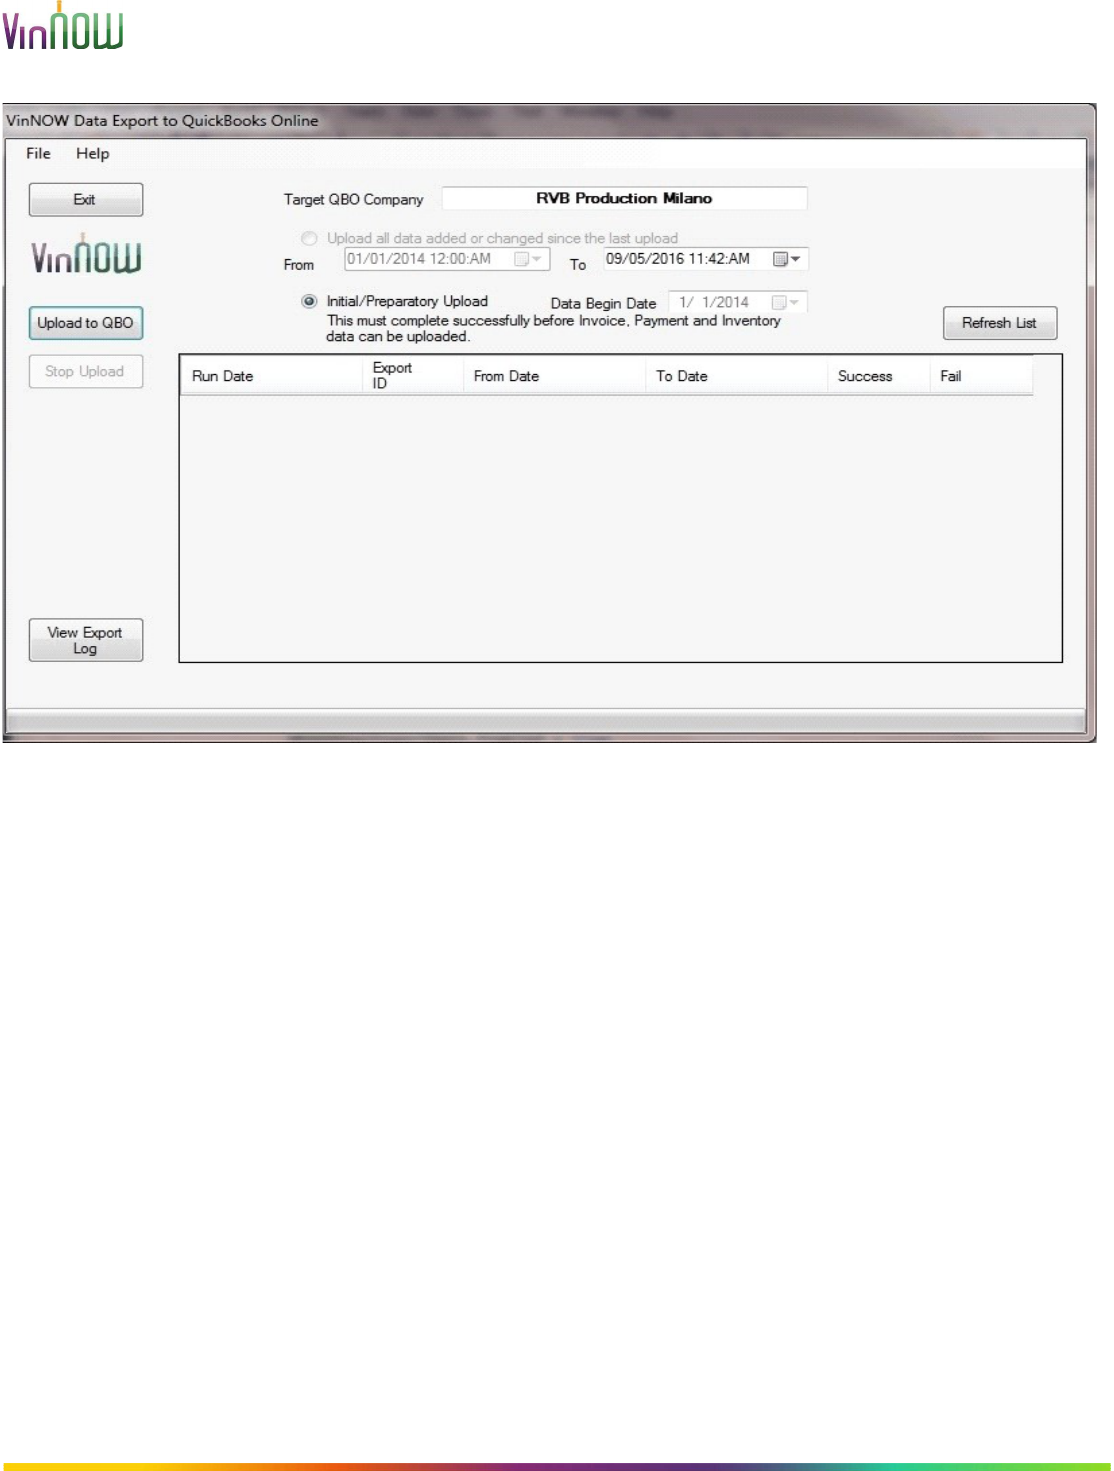
Copyright 2002-2021 V
W - All Rights Reserved.
For the Initial Upload, the only relevant date on the form is the "Data Begin
Date". This value should be set to the earliest date that your VinNOW Orders
must have to be selected for export to QBO. This date value can be set only
from the "QuickBooks® Online Company Setup" form.
Clicking the "Upload to QBO" button will present a confirmation dialog. Upon
confirming that you want the export to continue, the export of your VinNOW
data will begin. The initial upload process can take a substantial amount of
time, depending upon the number of Customer, Invoice and Payment records
selected for export.
Once the export begins the form will display a progress bar to indicate how
many records have been exported out of the total that are selected for
export. Text messages are displayed to detail which Invoice / Payment is
currently being uploaded.
If the export must be stopped, click the "Stop Upload" button.
Copyright 2002-2021 V
W - All Rights Reserved.
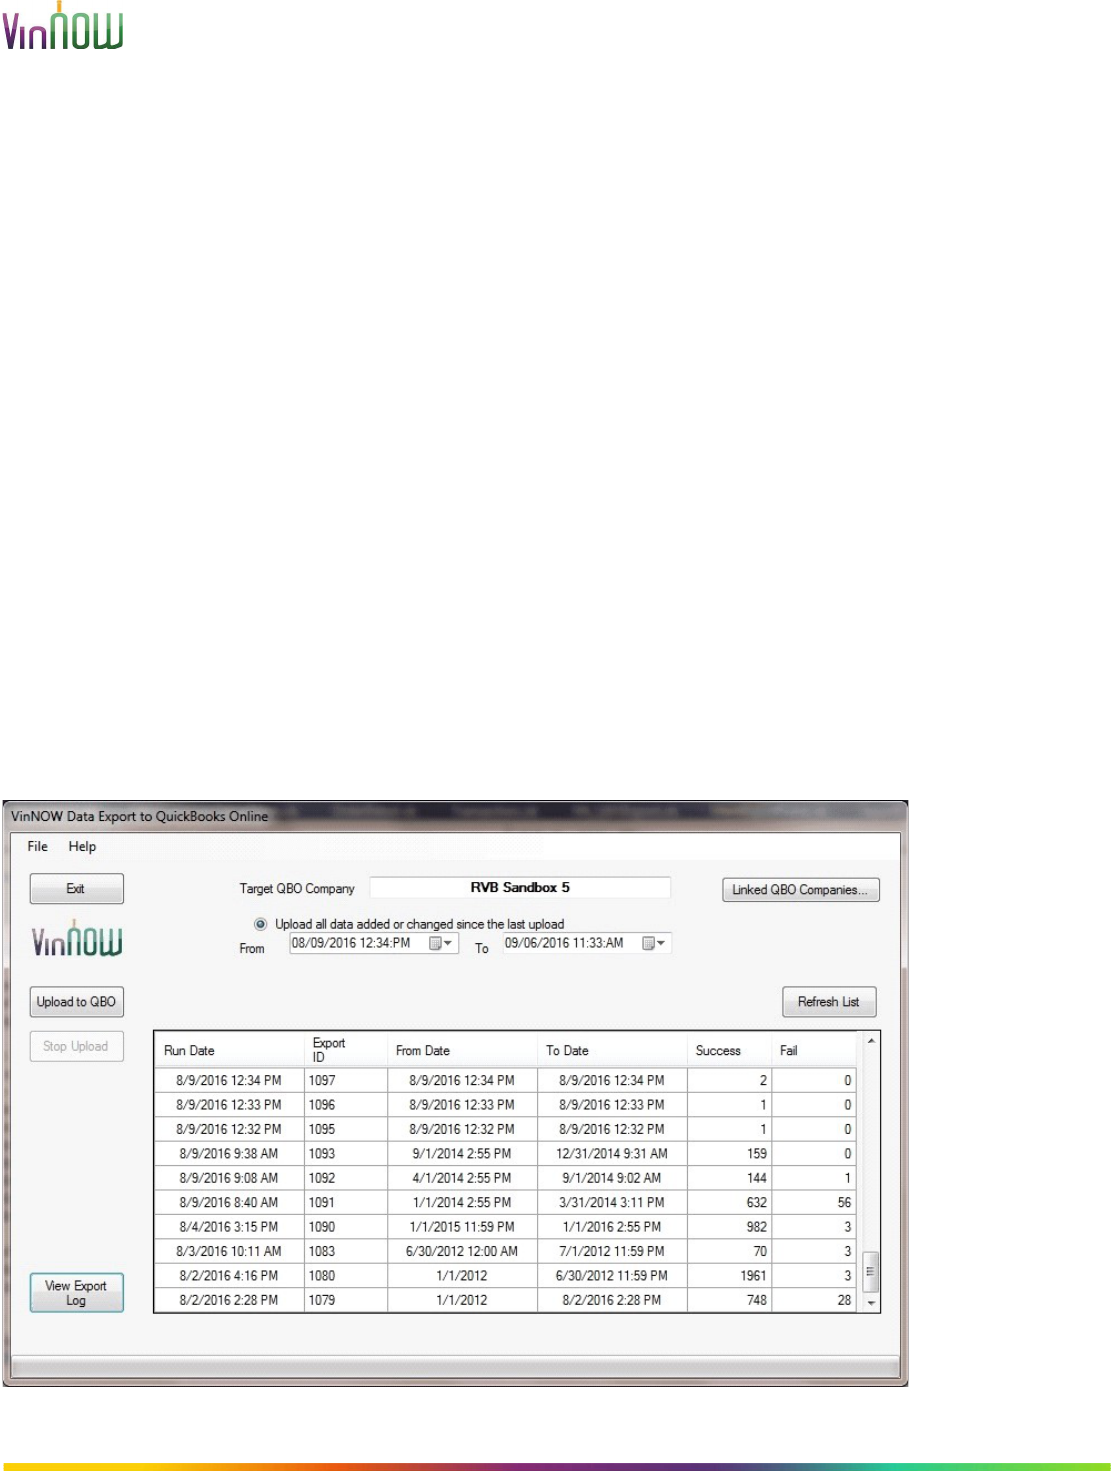
Transaction Uploads:
Once the Initial Upload has successfully completed, the data selected for
export to QBO is based on a date range. That range begins with the most
recent successful export date and ends with the current date. Only records
that have been ADDED or UPDATED within that date range will be selected for
export to QBO.
Both ends of the export date range are determined by the VinNOW program.
Clicking the "Upload to QBO" button will present a confirmation dialog. Upon
confirming that you want the export to continue, the export of your VinNOW
data will begin.
Once the export begins the form will display a progress bar to indicate how
many records have been exported out of the total that are selected for
export. Text messages are displayed to detail which Invoice / Payment is
currently being uploaded.

Copyright 2002-2021 V
W - All Rights Reserved.
The Export Log
A log, or report, of the records exported to QBO is available from the form by
clicking the "View Export Log" button. Prior to clicking the button, you must
select a row in the grid to indicate the export the report will be based on.
The Export Log can also be run using the "QuickBooks® Online Upload Log"
item under the VinNOW "Reports 2" menu. This method provides numerous
filters that you can apply to the report data.
Running the Export Log report for any QBO export that has a fail count will
allow you to see a description of why the attempted transaction failed. In
most cases, the description should provide enough information for the User to
resolve the issue. It that resolution results in a change to VinNOW data, then
the associated record should be selected as part of the next export to QBO.
